
LED light strips are a great way to provide bright and flexible lighting anywhere you need it. You can choose from many different colors, sizes, or shapes – there’s something for everyone! The eco-friendly solution will save energy while also being versatile in terms of color choice so that your project expression goes unmatched with these amazing little gadgets
In this blog post, we will be discussing how to connect two LED strips to one power source. We will go over the different types of connectors and cables that are available and discuss which ones are best for your project. We will also provide some tips on how to make the installation process as easy as possible. Let’s get started!
DIY lighting projects can be a great way to add some personal flair to your home. However, they can also be a source of frustration, particularly if you’re working with traditional sources of light. LED strips are a great alternative to traditional lightbulbs, and they can help you realize your creative vision for your home. LED strips are easy to connect and provide a bright, even source of light. They’re also very versatile, so you can use them to create all kinds of different looks. If you’re looking for an easy way to add some wow factor to your home, LED strips are a great option.
Choosing flexible LED ribbon lights to light your space is a no-brainer. But now you have to install them. This may seem like a daunting task but it is fairly simple if you follow some basic steps. Read on to learn more about how to connect and install LED light strips. This guide is applicable to different led strips, including RGB led strip china, 5730 led strip, cob led strips, SMD 5730, 5050 led strip lights, 3014 LED, 2835 led strip, 2216 led strip, and RGB addressable led lights.
1. What are the benefits of connecting two LED strips to one power source
LED strips are a versatile and energy-efficient lighting option, and they can be used in a variety of settings.
One advantage of LED strips is that they can be easily connected to a single power source. This allows for a neater and more efficient installation, as well as easier troubleshooting in the event of an issue.
In addition, connecting multiple LED strips to one power source can help to reduce energy costs. By using a single power source, you can eliminate the need for multiple outlets and save on your energy bill. Whether you’re lighting up a party or illuminating your home office, connecting your LED strips is a great way to save time and money.
The MSH LED strip is one option that is perfect for both indoor and outdoor use. It is weatherproof and RoHS compliant, making it a safe and reliable choice for any setting. With its easy installation and low energy consumption, the MSH LED strip is a great choice for anyone looking to reduce their carbon footprint.
2. How do you connect two LED strips to one power source
MSH addressable led strips are a great way to add color and life to any space. But what if you want to use two sets of led strips, instead of just one?
Fortunately, there are a couple of different ways that you can connect two led strip lights to one power source.
The first option is to daisy chain the strips together. To do this, simply solder one wire to the positive terminal of the first strip and the other wire to the negative terminal of the second strip. Then, connect the positive wire of the second strip to the positive terminal of your power source and connect the negative wire of your first strip to the negative terminal of your power source. This will complete the circuit between your two sets of led lights and allow them to share a single power source.
Another option is to use a T-connector to split the power between the two sets of led lights. To do this, simply soldered one wire to each terminal on the connector and then connect those wires to the corresponding terminals on your power source. This will allow each set of led lights to have its own dedicated power source, giving you more control over the look and feel of your space. Whichever method you choose, connecting two sets of led strips to one power source is a great way to save time and money.
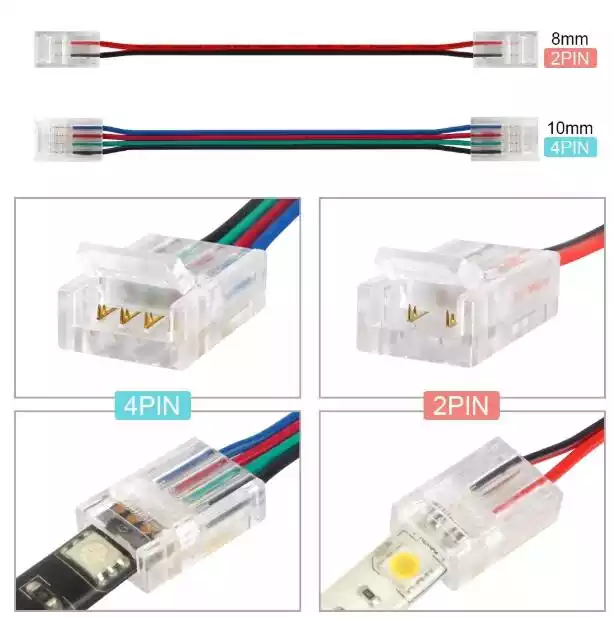
3. What kind of connectors do you need
When it comes to electrical wiring, there are a few different types of connectors that you might need to use. The most common type is the screw connector, which consists of two metal plates that are held together by a screw. Another type of connector is the push-in connector, which has a spring-loaded mechanism that holds the wires in place. There are also compression connectors, which compress the wires between two metal plates, and soldered connectors, which permanently fuse the wires together with solder. Depending on the specific application, any of these types of connectors could be the best option. MSH strip connectors are commonly used in homes and office buildings to connect multiple wires together. These connectors have a series of metal teeth that grip the wires securely, making them ideal for high-voltage applications.
Compression and soldered electrical connections are typically only used in industrial settings where higher voltages are involved because they provide a stronger connection than the screw or push-in connectors. In most cases, screw or push-in connectors will be sufficient for most home and office applications.
4. Which strip should be connected to the positive and which one to the negative
There are a few different ways to determine which strip should be connected to the positive and which one to the negative.
One way is to look at the color of the wires. Generally, the red wire is positive and the black wire is negative.
Another way to tell is by looking at the polarity symbols on the strips. The plus sign (+) indicates positive and the minus sign (-) indicates negative. Finally, you can also use a multimeter to test the strips. Touching one probe to the positive terminal and one probe to the negative terminal will give you a reading of 0. If you touch the probes to the opposite terminals, you should get a reading of 1. Based on whichever method you use, you can determine which strip should be connected to the positive and which one should be connected to the negative.
5. How do you determine the polarity of an LED strip
To determine the polarity of an LED strip, you’ll need to look at the orientation of the positive and negative leads. The positive lead is typically longer than the negative lead, and it will also have a flattening on the side. If you look at the LED strip from the front, the positive lead should be on the left side. Once you’ve determined which lead is which, you can connect the strip to your power source. Make sure to connect the positives to positives and negatives to negatives – if you reverse the leads, your LED strip won’t work. Keep in mind that some strips may be marked with arrows indicating which way the current should flow – be sure to follow these markings when connecting your strip.
6. Can you daisy chain multiple LED strips together
Yes, it is possible to daisy chain multiple LED strips together. Daisy chaining is a method of connecting multiple devices together using a single cable or connection. When applied to LED strips, daisy chaining allows you to connect multiple strips together, making it possible to create large, complex lighting designs. While daisy chaining multiple LED strips together is relatively simple, there are a few things to keep in mind.
First, it is important to use the same type and size of the strip for each connection.
Secondly, the number of strips that can be safely connected together will depend on the power rating of the strips and the power supply. Lastly, it is important to make sure that the connections are made correctly in order to avoid damaging the strips. When done correctly, daisy chaining can be an effective way to create complex lighting designs using multiple LED strips.
7. We will also provide some tips on how to make the installation process as easy as possible
Installing LED strips can be a bit of a challenge, especially if you’re trying to put multiple strips together. But don’t worry, we’re here to help! Here are a few tips to make the process as easy as possible:
Following these tips, you should be able to install your LED strips with ease!
- – Make sure all of your strips are the same length. This will make it much easier to connect them together.
- – Use zip ties or tape to secure the strips in place. This will prevent them from moving around and make it difficult to connect them.
- – Use a soldering iron to connect the strips together. This will provide a strong and reliable connection.
- – Testing the connection before you turn on the power. This will ensure that everything is working correctly.
1. Once you have your LED strips, the next step is to install them. But before you start, there are a few things you need to keep in mind.
First and foremost, you need to make sure that you’re using the proper power supply. If you’re connecting multiple strips together, then you’ll need a power supply that can handle the increased wattage. Additionally, make sure that your power supply is properly rated for indoor or outdoor use – depending on where you’ll be installing your LED strips.
Another thing to keep in mind is the spacing between the LED strips. If they’re too close together, then there might not be enough airflow and they could overheat. However, if they’re too far apart, then the light might not be evenly distributed. So, it’s important to find the right balance.
Finally, when it comes time to actually install the LED strips, be sure to use the proper adhesive. If possible, we recommend using double-sided tape or another type of strong adhesive. This will help to ensure that your LED strips stay in place and don’t fall off.
Installing LED strips can seem like a daunting task, but it doesn’t have to be. By following these simple tips, you’ll be able to install your new LED strips with ease. So go ahead and add some serious style to your home today!
2. Now that you know how to choose the right addressable LED strip and power supply, as well as how to properly space and
install the strips, it’s time to put your new knowledge to the test. Go ahead and purchase the supplies you need and then follow the instructions in this guide to install your very own LED light show. With a little bit of planning and effort, you’ll be able to create a truly stunning display that will impress everyone who sees it. So go ahead and get started today!
Conclusion
If you are looking for a reliable and easy way to connect two LED strips to one power source, we recommend using connectors and cables from MSHLED. Our products are made with high-quality materials and are backed by our 100% satisfaction guarantee. Contact us today to learn more about our products and how we can help you create the perfect lighting solution for your project.


