

LED light strips have become increasingly popular in recent years due to their versatility and energy efficiency. They are commonly used for decorative purposes, as well as for functional lighting in various settings. However, many people wonder if it is possible to cut LED light strips to fit specific lengths or shapes.
When you cut an LED light strip, you may be altering its functionality and performance. This is because the circuitry that controls the voltage and current flow may be disrupted, which can affect the overall illumination of the strip. It is important to follow manufacturer guidelines and consult with professionals before attempting to modify LED strips or any other entities related to them.
LED strip lights are composed of several components, including LED chips, circuit boards, adhesive backing, and protective coating. The LED chips are responsible for producing the illumination in the strip while the circuit board serves as its backbone by connecting the LED chips to a power source and controlling their output. The adhesive backing allows for easy installation on various surfaces while the protective coating shields the strip from damage and moisture.
Cutting an LED light strip should only be done when necessary and with caution. If done improperly, it can result in damage to not only to your LEDs but also your copper sections which could lead to legal issues regarding international copyright laws.
It is essential that you understand what happens when you cut led light strips before making any modifications. Cutting an LED light strip will divide it into smaller sections that will need separate power sources or connectors depending on how they were initially designed by manufacturers.
Understanding the Components of LED Light Strips
Identify the Designated Cutting Line on Your LED Light Strip

Before cutting your LED light strip, it’s crucial to identify the designated cutting line. This line is usually marked by a scissor icon or a dotted line. It’s essential to find this line because it indicates where you can cut your LED strip without damaging its circuitry.
Once you’ve located the designated cutting line, measure the length you need and mark the cutting point accurately. You can use a ruler or measuring tape to ensure that your measurements are precise. After marking the cutting point, make sure to double-check your measurements before proceeding to cut.
Use Sharp Scissors or a Cutting Tool to Avoid Damaging the Strip’s Circuitry
When cutting your LED light strip, it’s crucial to use sharp scissors or a cutting tool such as a box cutter or hobby knife. Using dull tools can cause damage to the circuitry of your LED strip, leading to electrical issues in the future.
To avoid damaging the circuitry of your LED light strip, place it on a flat surface and carefully cut along the designated cutting line using sharp scissors or a cutting tool. Make sure not to apply too much pressure when cutting as this can also damage the circuitry.
Make Sure to Cut Only at The Designated Cutting Point
It’s important only to cut at the designated cutting point on your LED light strip. Cutting elsewhere could lead to electrical issues and potentially ruin your entire LED strip.
If you need to cut in between designated points, use a soldering iron to reconnect the circuitry. However, if you’re not experienced with soldering irons, we recommend avoiding this step and sticking only to designated points for safety reasons.
Always Refer To The Manufacturer’s Instructions for Specific Cutting Guidelines
While these general guidelines are helpful when it comes down to basic principles of how to cut an led light strip properly, they may vary depending on what brand of led strips one has. Therefore, always refer to the manufacturer’s instructions for specific cutting guidelines. It’s essential to read and understand the instructions before proceeding with any cutting.
Preparing Your Wall for LED Light Strip Installation: Clean and Dry

Sharp Scissors for Precise Cuts
Using the right tools is crucial when working with LED light strips. scissors are a convenient tool to use as they can easily cut through the strip without damaging the lights or wires. However, it’s important to use a sharp pair of scissors to ensure clean and precise cuts along the designated cut lines on the light strip.
When using dull or inappropriate scissors, you risk damaging the strip, which may result in malfunctioning lights or exposed wires that pose a safety hazard. Therefore, investing in a sharp pair of scissors specifically for cutting LED light strips is essential.
Box Cutters and Sharp Knives for RGBIC Light Strips
While scissors are suitable for most LED light strips, they may not be ideal for RGBIC light strips or Hue Lightstrips that have quick connectors. In such cases, it’s recommended to use a box cutter or sharp knife instead of scissors to avoid damaging the connectors.
When using a box cutter or sharp knife, make sure to follow the designated cut lines carefully and avoid applying too much pressure that could damage the connector. By doing so, you’ll ensure that your RGBIC light strips remain functional and connected properly.
Soldering Wires After Cutting LED Light Strips

In some cases, soldering might be required after cutting an LED light strip. When soldering wires together, it’s crucial to make sure that they’re properly insulated and secured to prevent electrical hazards.
Before beginning any soldering work on your LED light strips, turn off all power supplies and unplug any connections from your wall outlet. This step ensures that there are no electrical currents flowing through your system while you’re working on it.
Once you’ve completed soldering any necessary wires back together on your LED light strip, double-check all connections before plugging everything back in again. By taking these precautions when working with LED light strips, you’ll ensure that your installation is safe, secure, and long-lasting.
Peel Back the Adhesive Strip

When installing LED light strips on your wall, it’s important to prepare the surface properly. Start by cleaning the area where you plan to install your LED light strip thoroughly. Make sure there are no dust particles or debris that could interfere with the adhesive backing.
Once you’ve cleaned the surface, peel back a small section of the adhesive strip on your LED light strip and place it onto the wall where you want it installed. Slowly peel back more of the adhesive strip while pressing down firmly on the LED light strip until it’s fully attached to the wall.
Check Your Work
After installing your LED light strips, take some time to check your work before turning everything back on. Ensure that all connections are secure and free from any damage or exposed wires. Turn on your power supply and test each section of your LED light strip to make sure everything is working correctly.
By taking these precautions when working with LED light strips, you’ll ensure that your installation is safe, secure, and long-lasting. Remember always to use sharp scissors for precise cuts and box cutters or sharp knives when cutting RGBIC Light Strips or Hue Lightstrips with quick connectors. Finally, double-check all connections before plugging everything back in again after soldering any necessary wires together.
How to Connect LED Light Strips: Open, Place, and Cover
Measure the LED Light Strip to Determine Where to Cut It
Before you start cutting your LED light strip, you need to measure it first. This will help you determine where to make the cut so that your lights fit perfectly in your desired location. Use a measuring tape or ruler to measure the length of the area where you want to place your LED light strips.
Use a Sharp Pair of Scissors or a Craft Knife to Cut the Strip Along the Designated Cut Line
Once you have measured and marked the designated cut line, use a sharp pair of scissors or a craft knife to cut through the strip. Make sure that you are cutting along the designated line, as this is where it has been designed for cutting.
Make Sure to Cut Through All Layers of The Strip, Including The Circuit Board and Adhesive Backing
It is important that when cutting through your LED light strip, you make sure that you cut through all layers of it. This includes both the circuit board and adhesive backing. If you don’t do this, then there’s a chance that your lights won’t work properly once they’re installed.
Reconnect The Cut Ends Of The Strip Using Solder or A Connector If Necessary
If necessary, reconnecting the cut ends of your LED light strip can be done using either a solder or a connector. Soldering is an effective method for reconnecting wires and ensuring they stay together securely. However, if soldering isn’t something that you’re comfortable with doing yourself then using connectors can also be an option.
For More Detailed Instructions Refer To The WikiHow Website For A Step-By-Step Guide On Cutting Led Light Strips
If you’re still unsure about how best to connect your LED light strips after reading this article then make sure that you refer back to WikiHow for more detailed instructions on how best to do so. Their step-by-step guide will provide clear instructions on what needs to be done at each stage of the process.
Cover, Place, and Position
Once you have cut and reconnected your LED light strips, it’s time to cover them up. This can be done using a variety of different methods depending on your personal preference. Some people like to use electrical tape to cover their lights while others prefer to use silicone sealant.
There are a few things that you need to keep in mind. Firstly, make sure that they are placed in an area where they won’t be knocked or bumped into as this could cause damage to both the lights themselves and any surrounding objects. Secondly, ensure that they are positioned correctly so that they provide the desired level of lighting for your needs.
Choosing the Right Cutting Point for Your LED Light Strip
Attach an End Cap to the Cut End of the LED Light Strip
When cutting your LED light strip, it’s important to attach an end cap to prevent any exposed wires. This will not only protect you from electrical shock but also ensure that your LED light strip functions properly. The end cap will provide a barrier between the cut end of the strip and the outside world, preventing moisture or debris from entering.
To attach an end cap, simply slide it onto the cut end of your LED light strip and secure it in place with adhesive glue. Make sure that all exposed wires are covered by the end cap before plugging in your lights.
Test Your LED Light Strip

Before installing your newly cut LED light strip, it’s crucial to test it by plugging it in and ensuring that all sections are working properly. This step is especially important if you have made multiple cuts to your light strips or plan on connecting multiple strips together.
To test your LED light strip, plug it into a power source and check each section for proper illumination. If any sections aren’t working correctly, double-check the connections and make sure everything is securely in place.
Use Adhesive Tape or Clips to Secure Your LED Light Strip
Once you’ve confirmed that your LED light strip is functioning correctly, use adhesive tape or clips to secure it in place on your desired surface. Depending on where you’re installing your lights, different types of adhesive may be more suitable than others.
For example, if you’re attaching your lights to a smooth surface like glass or metal, double-sided tape may work well. However, if you’re attaching them to a textured surface like drywall or wood paneling, clips may be a better option.
Consider Using a Connector for Multiple Cut Strips
If you need a longer length of LED light strips than what one roll can provide, consider using connectors to join multiple cut strips together. These connectors come in various shapes and sizes and are specifically designed to work with LED light strips.
When using connectors, make sure that you’re connecting the correct wires together. Most connectors will have clear labeling or color coding to help you match up the wires correctly. Using a connector will not only save you time but also ensure that your LED light strip functions properly.
Refer to Manufacturer Instructions for Additional Installation Steps
While these steps should cover most of the basics it’s always best to refer to any additional instructions provided by the manufacturer. They may have specific tips or tricks for installation depending on the type of lights you’re working with.
Additionally, if you’re unsure about any step in the process, don’t hesitate to reach out to customer support for assistance. It’s better to be safe than sorry when it comes to electrical installation.
Enjoy Your Newly Installed LED Light Strips
Once your LED light strips are installed and functioning correctly, sit back and enjoy your newly created ambiance. Adjust the brightness or color settings as desired and bask in the glow of your custom lighting creation.
Using a Pair of Scissors to Cut LED Light Strips with Ease
Cutting LED Light Strips with Scissors: Tips and Precautions
Flexible LED light strips have become a popular lighting solution for both residential and commercial spaces. They are easy to install, energy-efficient, and versatile enough to fit any design concept. However, their flexibility also means that they come in long lengths that might not always fit the desired installation area. The good news is that you can cut LED light strips into smaller sections without damaging the LEDs or compromising their functionality.
Here are some tips and precautions to keep in mind when cutting LED light strips with scissors:
Carefully Identify Cut Lines
Before cutting your LED light strip, make sure you identify the cut lines properly. These are usually marked by copper dots or vertical lines on the circuit board. Cutting anywhere else might damage the circuitry or cause the LEDs to malfunction.
Use Sharp Scissors
Using sharp scissors will ensure a clean cut through the flexible circuit board without damaging any of its components. Avoid using box cutters or other sharp tools as these may leave rough edges that could affect the strip’s function.
Measure Twice, Cut Once
To avoid making mistakes when cutting your LED light strip, measure twice before making any cuts. It’s better to be safe than sorry when it comes to trimming your light strip down to size.
Mind Your Fingers
When cutting your LED light strip, be mindful of your fingers as well. Make sure they are clear of where you intend to make the cut so that you don’t accidentally injure yourself.
Follow International Copyright Laws
When modifying an existing product like an LED light strip, it is crucial to follow international copyright laws. This means only using them for personal use and avoiding selling or distributing them after modification unless permission has been obtained from the manufacturer.
Check the Manufacturer’s Instructions
It’s essential to read through the manufacturer’s instructions before attempting any modifications to your LED light strips. Some manufacturers may have specific guidelines on how to cut their products, which could affect the warranty or lead to damage if not followed.
Seek Professional Assistance
If you are unsure about how to cut your LED light strips, it’s always best to seek professional assistance. A licensed electrician or lighting technician can help ensure that your modifications do not damage the strip’s functionality and keep you safe from electrical hazards.
Fixing and Using Cut LED Light Strips: Tips and Tricks
Opening the Connector Cover
Before connecting LED light strips, you need to open the cover of the connector. This is an essential step that allows you to insert the strip into the connector properly. To open the connector cover, use your fingers and gently push down on both sides of the cover until it pops off.
Placing LED Strip into Connector
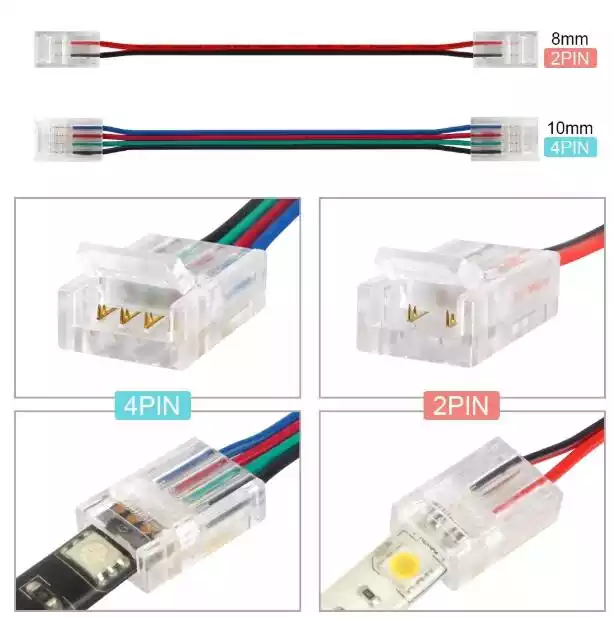
Once you have opened the connector cover, place the LED strip into the connector in the correct position. Make sure that you align both the positive and negative sides of the strip with those of the connector. If you do not align them correctly, this can cause electrical issues or even damage your LED lights.
Aligning Positive and Negative Sides
To avoid any potential issues with your LED strip lighting, it is crucial to align both the positive and negative sides correctly. The easiest way to identify these is by looking for a small “+” or “-” sign on each side. Once you have identified which is which, make sure they match up when inserting your LED strip into its corresponding connector.
Securing Your Connector
Finally, once you have placed your LED strip into its corresponding connector and ensured that both positive and negative sides are aligned correctly, it’s time to secure everything in place. You want to ensure that everything is tight enough so that there are no loose connections or exposed wires that could lead to electrical problems.
Yes, You Can Cut LED Light Strips!
Cut LED strip lights can still be used and fixed
LED light strips are flexible, versatile, and easy to install. They come in a variety of colors and brightness levels, making them ideal for accent lighting, task lighting, or mood lighting. However, sometimes you may need to cut LED light strips to fit a specific length or shape. The good news is that cutting LED light strips is possible without damaging the lights.
If you accidentally cut your LED light strip in the wrong place or if it doesn’t work after cutting it, don’t worry. You can still use and fix your cut LED light strip by following some simple steps.
Make sure to cut at the designated cutting marks
Before cutting your LED light strip, make sure you know where the designated cutting marks are located. These marks indicate where you can safely cut the strip without damaging the circuit board or the LEDs themselves.
The location of these marks varies depending on the manufacturer and model of your LED light strip. Some models have cutting marks every few inches while others have them every few feet. Check your user manual or consult with an expert if you’re not sure where to cut.
Use soldering or connectors to reattach cut sections
After cutting your LED light strip at the designated mark, you’ll need to reconnect it using either soldering or connectors. Soldering involves melting metal onto two surfaces so that they bond together permanently. Connectors are small plastic pieces that snap onto both ends of a wire and hold them together securely.
Soldering is more permanent than connectors but requires more skill and equipment. If you’re not comfortable with soldering, consider using connectors instead.
Consider voltage drop when cutting and reconnecting LED strips
Voltage drop is a common issue when working with long lengths of LED light strips. When you connect multiple sections of LEDs together over long distances, voltage drops occur due to resistance in wires causing the dimming of lights further down from the power source. Therefore, it’s important to consider voltage drop when cutting and reconnecting LED strips.
To avoid voltage drops, make sure to use the appropriate gauge of wire for your LED light strip. Also, try to keep your connections as short as possible and use a power supply with enough wattage to support your entire LED light strip.
Test the cut sections before permanently installing them
Before permanently installing your cut LED light strips, test them first. This will help you identify any issues or defects that may have occurred during the cutting process.
To test your cut sections, simply connect them back together using soldering or connectors and plug them in. If they work properly without any flickering or dimming issues, then you’re good to go.
Use proper tools and techniques to avoid damaging the LED lights
Finally, make sure to use proper tools and techniques when cutting and reconnecting your LED light strips. Use sharp scissors or a utility knife instead of a saw or other power tools that can damage the circuit board or LEDs themselves.
When soldering, make sure you don’t overheat the circuit board or melt any plastic components nearby. And always wear safety goggles and gloves when working with electrical components.
Step-by-Step Guide: How to Cut LED Light Strips
Clean the Wall Surface Thoroughly Before Installation
Before starting the installation process, it’s essential to clean the wall surface thoroughly. Any dirt or grime can interfere with the adhesive backing of the LED light strip and cause it to come loose over time. Use a damp cloth and mild detergent to wipe down the wall surface, paying extra attention to any areas where you plan to install the LED light strips.
Make Sure the Wall Is Dry to Avoid Any Moisture-Related Issues
Moisture is one of the biggest enemies of LED light strips. If moisture gets trapped between the adhesive backing and the wall surface, it can cause damage to both surfaces over time. That’s why it’s crucial to make sure that your wall is completely dry before installing LED light strips.
Check the Power Supply and Ensure It’s Working Correctly Before Starting the Installation
Before starting your installation project, check your power supply and ensure that it’s working correctly. Make sure that you have enough power capacity for all of your LED light strips, and double-check that all wiring connections are secure.
Peel Back a Small Section of Adhesive Backing To Test Placement
Once you’ve prepped your wall surface and checked your power supply, it’s time to start installing your LED light strips. Begin by peeling back a small section of adhesive backing from one end of your strip. This will allow you to test placement and make any necessary adjustments before committing fully.
Continue Peeling And Sticking The LED Light Strip Along The Wall
Once you’re satisfied with the placement, continue peeling back sections of adhesive backing as you stick your LED light strip along the length of your wall. Make sure that each section is straight and secure before moving on to the next.
Check Final Installation for Any Loose or Unsecured Areas
After completing the installation, take a few moments to inspect your work closely for any loose or unsecured areas. Pay particular attention to corners or areas where the LED light strip may have been cut to fit. If you notice any issues, take the time to fix them now before they become bigger problems later on.
Installing Your Cut LED Light Strips: The Final Steps
Now that you have successfully cut your LED light strips to the desired length, it’s time to install them and enjoy the beautiful lighting in your space. But before you do that, there are a few final steps you need to take to ensure a smooth installation process.
Firstly, make sure that the surface where you will be installing the LED light strips is clean and dry. Any dirt or moisture can affect the adhesive of the strip and cause it to fall off over time. Use a clean cloth or paper towel to wipe down the surface and let it air dry completely before proceeding.
Next, carefully remove the backing from the adhesive side of your cut LED light strip. Be gentle when doing this as pulling too hard can damage the strip. Once you have removed the backing, place your strip onto the surface and press firmly along its entire length to ensure proper adhesion.
If you need to connect multiple strips together, make sure that they are properly aligned before connecting them using soldering or connectors. Remember not to exceed their maximum wattage capacity as this could cause damage or even a fire hazard.
Once all of your LED light strips are in place, cover any exposed wires with electrical tape for safety purposes. This will also give your installation a neat and professional look.
Finally, plug in your power source and turn on your newly installed LED light strips! You’ll be able to enjoy their beautiful illumination for years to come.
FAQ


